This is my first photo editing blog, and it relates to a subject that brings up mixed emotions to many photographers, Layers in Photoshop. The best way to give a crash course in CS5 layers is to do it in person, but since I have this blog I'll do my best to explain it here. I will be using screenshots to step through the basic process of working with layers. Well, here goes nothing!
 |
| This is the original photo. It is underexposed and looks grey and murky. It obviously needs to be worked. |
 |
| This is when layers come in. Begin by moving your arrow towards the bottom right of Photoshop, and select the half filled circle. By doing this you have just opened a menu of available editing layers. |
 |
| We will be working in the Brightness/Contrast Layer, but as you experiment with Photoshop your workflow will more than likely change to fit your own photographic needs. Once we select Brightness/Contrast we can immediately begin to change either variable, by moving the slider left or right. Play with the levels until you are happy with your work. |
 |
| Next, I like to work on the photo's Vibrance, or Saturation. Click on the half filled circle again, and this time select the Vibrance option. The Vibrance variable is basically a less harsh saturation editor. Again work either Vibrance or Saturation until you are happy with your photos settings. |
 |
| Next, I will work with the exposure. Select that half filled circle again, and click the exposure option. This option will now help our under exposed photo look more natural. I select the gamma correction slider to enhance the contrast curve. Again just work with the image until you are happy with it's look. |
 |
| Although I will not actually be using the Curves option, I will show its basic functions because some people love it (it is actually pretty cool). Well after you select the Curves option you will see a graph where the previous editing "sliders" were. Move your mouse over the diagonal line and click it. You should have created a point. Now you can move the point in any direction, but as you move the point your photo will change. |
 |
| As you can see you can add multiple points to the curve, creating surreal effects to your photos. I personally would only use the Curves tool to slightly enhance my photograph, but since I was happy with the prior editing I will remove these points. To remove the Curve points just select the points and bring them straight to the bottom of the graph, they should be removed. |
After removing the points on the curve, and I am happy with the editing that I did the next step is to flatten the layers. Simply go into the Layer option on the top of the Photoshop (it is the fourth option on the left) and then select the Flatten Image option (the second option from the bottom).
 |
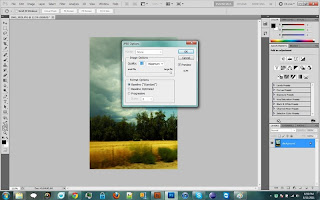
| Now select Save As |
Immediately after selecting Save As, select to Maximize the image and move the slider to 12. Then select OK.
 |
This is a comparison between the two images in Adobe Bridge.
I really hope that this blog in a sense helped you "get your feet wet"with Adobe Photoshop Layers. If you have any questions please feel free to comment, and I will do my best to respond. |


